A flat backlog is a graveyard of good intentions. It’s a one-dimensional list that grows longer but never clearer, breeding a quiet chaos that slowly drains your team's momentum. You have tickets. You have epics. But do you have a story?
A disorganized backlog is like a grocery list written by three people for three different meals. You have milk, bread, tomatoes, and onions all jumbled together. There is no sense of the journey through the store, and no clue what you’re actually cooking. Does that sound familiar?
This is where user story mapping changes everything. It’s not just another agile ceremony. It’s a fundamental shift in perspective.
From Linear List to Spatial Narrative
A user story map takes your endless backlog and turns it into something you can actually see: a picture of your user’s journey. It organizes work not by feature requests, but by what the user is actually doing. This is a crucial part of any good product discovery framework because it forces everyone to build a shared understanding of what you're making and for whom.
Time isn't a conveyor belt; it's a switchboard. A story map works the same way, connecting different activities and tasks into a coherent whole.
The basic gist is this:
- The Horizontal Axis (The Backbone): This is the user's journey, laid out as major activities. These are the big things a user does, like “Create Account,” “Search for Product,” and “Complete Purchase.”
- The Vertical Axis (The Details): Stacked under each activity are the user stories, prioritized vertically. The most critical tasks for a minimum viable journey sit right at the top.
This structure lets you see the entire system at a single glance. I watched a product manager friend use this for a new feature launch. Instead of walking into a room with a 200-item backlog, she put a single, sprawling map on the wall. Immediately, the engineers saw the dependencies. The designer understood the flow. The stakeholders got the release strategy. No one had to ask what was important; they could see it.
The map makes the invisible visible.
It transforms a pile of requirements into a narrative that everyone can understand and rally behind. By visualizing the journey, you stop asking, "What's next on the list?" and start asking, "What does the user need to do to succeed right now?"
That shift is the difference between shipping features and delivering value. For teams drowning in tickets, figuring out how to prioritize your product backlog with a map is the first step out of the chaos.
Anatomy of an Effective Story Map
A great story map is more than a wall of colorful sticky notes. It’s a structured thinking tool. It forces a narrative onto the chaos of product development, turning a pile of ideas into a strategic blueprint.
Without this structure, you just have a collection of features. With it, you have a plan.
This is the shift from a flat, disorganized backlog to a clear, journey-based map. It’s the difference between confusion and shared understanding.
A good user story mapping template provides the framework to make this happen.
The Backbone of the Journey
First, you need a backbone. This is the horizontal axis of your map, laying out the high-level activities a user performs from start to finish. Think big steps, not granular details, all in chronological order.
For example, if you were building a new checkout setup for a Shopify merchant, your backbone might look like this:
- Configure Payment Gateways
- Set Shipping Rates
- Customize Checkout Branding
- Define Tax Rules
- Activate Checkout
Each item is a distinct chapter in the user's story. Nailing this sequence is the first and most critical step. It creates the narrative arc that every other story will hang on. You can see how this structure would inform a real artifact like this user flow for a new Shopify setup.
The Walking Skeleton
With the backbone in place, you can build the walking skeleton. This is not your MVP. It’s the absolute bare-minimum version of the product that lets a user complete the entire journey, even if it’s crude.
This is what I mean: for each activity in your backbone, you pick the one essential user story that makes the journey possible. Nothing more.
A walking skeleton is the simplest narrative thread that connects the beginning of the user's journey to the end. It ensures your first release is a functioning, albeit minimal, product rather than a set of disconnected features.
This forces ruthless prioritization. You’re focused only on what’s essential for a complete, testable path. If you want to dive deeper, we have a detailed guide on story maps vs. user journey maps.
Slicing for Subsequent Releases
Once your skeleton is standing, everything else is organized into vertical slices for future releases. The remaining user stories are grouped under their respective backbone activities and then ordered by priority. The most valuable stories sit right below the skeleton, with lower-priority ones falling further down the map.
This is a zoom-out moment. The structure of the map reveals the economic incentives at play. By delivering a thin, complete slice of value early (the walking skeleton), you enable faster feedback loops, which de-risks larger investments. Instead of spending six months on a "big bang" launch that might miss the mark, you spend weeks validating the core journey. This dramatically changes the financial risk profile of product development.
In short, a user story mapping template doesn't just organize work: it clarifies strategy and de-risks investment.
For the initial triage of what enters the map, use the action priority matrix to filter by effort and impact.
How to Run a Story Mapping Session That Works
A story mapping session is a delicate thing. Get it wrong, and you're just facilitating group chaos on a whiteboard. Get it right, and you’re conducting an orchestra, aligning every part of the team toward a single, shared reality of the user's world.
Building a map is a team sport, but it needs a referee. It’s your job as the facilitator to provide the structure that allows good ideas to surface and connect. The goal is not just a wall of sticky notes, it is collective clarity.
Setting the Stage for Success
Preparation is the invisible 90% of a successful session. A poorly prepared session is an expensive meeting that produces confusion instead of alignment. Before you even book the room, get your foundation right.
You need to arrive with a clear definition of the problem you're solving and for whom.
- Define Your Persona: Who is the user? Be specific. "A busy parent" is not a persona. "A working mother of two under five trying to order groceries during her lunch break" is. This focus prevents the map from becoming everything to everyone.
- Frame the Problem: What specific problem does this person have that your product aims to solve? Articulate it as a concise problem statement. This becomes the north star for every decision made in the room.
- Gather Context: Collect relevant data, user feedback, or competitive analysis. This isn't for a presentation. It's for answering the inevitable "why are we doing this" questions with evidence, not just opinions.
Facilitating the Flow
Last week I watched a product manager navigate a session with a simple but powerful rule: for the first 30 minutes, there was a "no-solutions" policy. The team was forbidden from talking about features, buttons, or UI.
They could only talk about the user's goals and struggles. This move was brilliant. It forced the entire team, especially the engineers, to inhabit the user's world before trying to build it. That is the core of good facilitation.
You are not there to have the best ideas. You are there to create an environment where the best ideas can be found, debated, and organized into a coherent narrative.
To keep the team focused, use specific, chronological prompts. Avoid open-ended questions like "what should we build?" Instead, guide the narrative forward and backward along the backbone.
- "What is the very first thing our user needs to do?"
- "Okay, they've just done that. What must they accomplish right before this next step?"
- "What is the one thing they absolutely need to achieve in this part of the journey?"
These prompts force linear, cause-and-effect thinking. They help the team build the story one logical step at a time. For remote teams, using an online post-it note board can help maintain this structured flow. Finally, remember to capture everything. The map is your output, a visual record of the shared understanding you just built. It’s the artifact that will guide design, development, and every conversation that follows.
From Map to MVP: How to Slice Your Releases
So you have built your map. The team got together, you hammered out the user's journey, and now you have this beautiful, sprawling picture of everything you could build.
Now what? How do you turn this picture into a plan?
I’ve seen more teams fail here than anywhere else. The mapping goes great, but the slicing, which is deciding what to build first, goes completely off the rails. They fall into the trap of shipping a collection of half-finished parts instead of a single, working product.
Don't Ship a Wheel, Ship a Skateboard
This is where the "walking skeleton" comes in. It is the most powerful idea for slicing your map correctly.
Think of it like this: if your product is a car, your first release should not be one perfect, chrome-finished tire. It's useless. It should be a skateboard.
A walking skeleton is the most basic version of the whole thing that actually works. It has a board, four wheels, and it gets you from Point A to Point B. Sure, it might be crude and slow, but it runs.
That's the entire goal of your first slice. You’re defining the simplest possible end-to-end journey that delivers a tiny piece of real value.
A map sliced vertically creates releases. A map sliced horizontally creates a mess. Your first slice must be a thin, vertical sliver that cuts across the entire backbone of user activities.
This single discipline forces you to ship a complete story, not just a random feature. A Forrester survey found this approach can drive a 35% improvement in feature prioritization accuracy. You can see a deeper dive on how this cuts down scope creep in this overview of user story mapping templates.
Prioritize by Value and Fear
Okay, so you have defined your walking skeleton. The rest of the map is a backlog of all your other user stories, neatly organized under their activities. How do you decide what comes next?
You keep slicing vertically, prioritizing based on two things:
- User Value: Which stories, when added to your skeleton, deliver the next biggest win for the user?
- Risk and Learning: Which stories are loaded with the biggest assumptions or technical unknowns? Build these earlier to kill the risk and learn what you don't know.
A friend at a transportation startup used this exact method. Their walking skeleton was simple: "book a basic ride from A to B." The very next slice was not fancy payment options or driver ratings. It was one thing: the ability to change your destination mid-trip.
Why? It was a huge user need and a high-risk technical problem they needed to solve. As you define each slice, you also define your test scope. For that trip-change feature, the team could immediately generate a list of test cases for Waymo to ensure quality was baked in from day one. You're not just mapping, you're building a roadmap to a real, agile minimum viable product.
Your Story Map is a Living Document, Not a Static Photo
Your user story map can’t be a static artifact. It’s not a photograph from a workshop, destined to gather dust. If that's all it is, you have wasted your time. Its real power is unlocked when it becomes the living, breathing source of truth for everything that comes next.
Think of your map as a switchboard, plugged directly into your product development engine.
The map creates a shared reality. This is your team's anchor. Without a central, visual guide, the engineer’s understanding of a feature slowly diverges from the designer’s mockups, and both wander away from the product manager’s original intent. The story map is the force that pulls everyone back to center.
From Map to Machine
Your story map is the blueprint. Your tools, like Figma, Jira, or Linear, are where the work actually happens. The goal is to connect the blueprint to the factory floor without losing anything in translation.
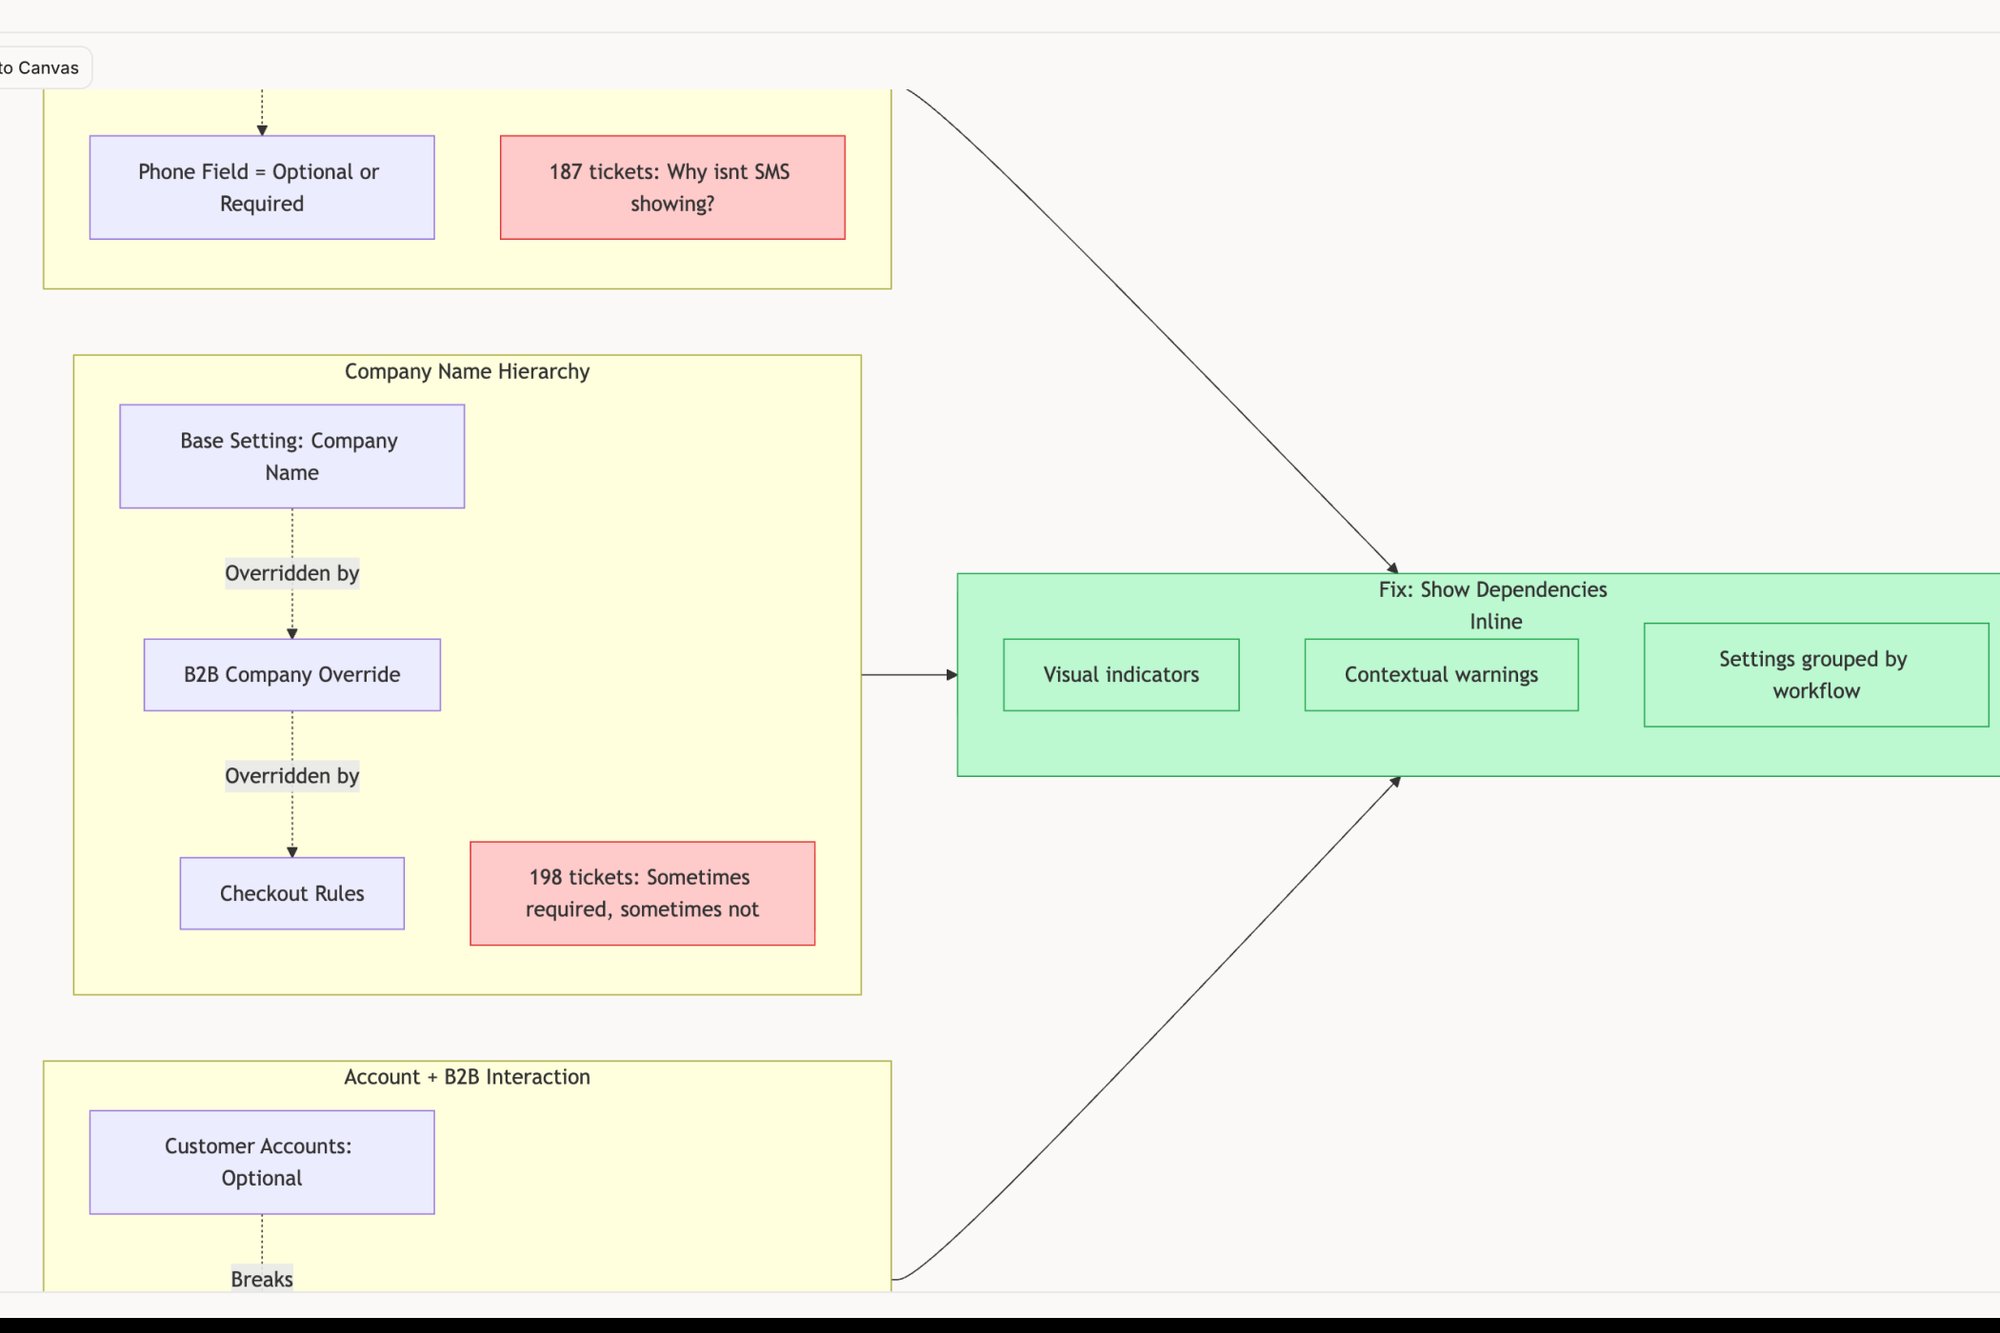
A friend at a SaaS company recently mapped a complex flow for handling network degradation, similar to the edge cases in a Zoom network resilience map. That map uncovered 17 distinct failure states.
Each of those states needed something different:
- A specific UI screen designed in Figma.
- A set of user stories and tasks created in Jira.
- A list of test cases for the QA team, much like these test cases for a Waymo trip modification.
Without integration, the PM would have spent hours manually copying and pasting. That manual work is where context gets lost and mistakes creep in.
The goal is to make the story map the headwaters from which all other work flows. A change on the map should ripple downstream, updating your design files and development backlogs automatically.
Activating the Connections
Modern platforms are finally making this seamless. By linking your user story mapping template directly to your other systems, you create a powerful, dynamic feedback loop.
This is what it looks like:
- Design: A slice of your map can instantly generate a set of frames or a user flow in Figma. When a story changes on the map, the corresponding design file gets a heads-up.
- Development: A prioritized slice can be pushed straight to Jira or Linear, creating epics and stories that are already populated with context from the map.
- Quality: The map’s structure naturally outlines your test plan. Every story becomes a testable requirement. A simple task assignment card, for instance, has multiple states that can be explored as interactive component states before development begins.
As Mike Cohn described in his book User Stories Applied, the "As a..., I want..., so that..." format provides the DNA for these work items. The map gives you the strategic "who," "what," and "why," which then feeds the tactical tickets.
Your next step is to prove it works. Pick a single slice from your map and pilot the integration. The immediate clarity you give your team by automating this handoff is the first step toward making your story map a truly living document.
Your Next Action: Schedule a 90-Minute Conversation
Alright, you have the theory. You have the template and the concepts. Now what?
The difference between a team that gets user-centricity and one that just talks about it comes down to a single action.
Find one upcoming feature. It doesn't matter how small. Before a single line of code is written or a spec doc is circulated, block 90 minutes on the calendar. Invite one designer and one engineer. That's it.
Do not call this meeting "User Story Mapping." That sounds like jargon. It sounds like process, and you might get eye-rolls.
Instead, call it: ‘Whiteboarding the User Journey.’
Your goal in that room is not to create a perfect artifact. The goal is to have a completely different kind of conversation. Use the backbone and walking skeleton ideas to sketch out the user's narrative, step by step. What do they do first? Then what? What are they thinking at this point?
This is where the magic happens. You’re not talking about your team's to-do list; you’re talking about the user’s story. A messy, living map on a whiteboard anchors everyone to the same reality in a way a static document never can.
A single 90-minute session will uncover more hidden dependencies and misaligned thinking than a week of Slack messages ever could. You'll find the weak spots in the plot.
That one focused conversation is the most valuable feature you can build next.
Go schedule it now.
Common Questions (and Straight Answers)
As teams get their hands dirty with story mapping, a few questions always seem to pop up. Let's tackle them head-on.
How Is a User Story Map Different from a Customer Journey Map?
Think of it like this: a customer journey map is the entire road trip. It covers everything from how a user first hears about you to their experience with your product and even how they interact with customer support weeks later.
A user story map, on the other hand, is the turn-by-turn directions for one specific part of that trip. It focuses intently on the steps a user takes inside the product to get something done. One shows you the landscape; the other gives you the route.
Can I Create a User Story Map By Myself?
You can, but you shouldn't.
Drafting a map alone is a fine way to organize your own thoughts. But the real value happens when you get product, design, and engineering in a room to build it together. That is when the user story mapping template transforms from a document into a source of shared understanding.
A solo-created map is a guess. A team-created map is a shared commitment.
What Is the Best Tool for Creating a User Story Map?
Honestly, the best tool is the one your team will actually use.
For teams in the same room, a physical whiteboard and sticky notes are tough to beat. For remote or hybrid teams, digital whiteboarding tools like Miro or FigJam offer that same collaborative energy. You can check a general FAQ page for other agile tools.
But for a truly connected workflow, you'll want a tool that doesn't just stop at the map. AI-driven platforms that link your map directly to your backlog and design files create a single source of truth that stays up to date.
How Detailed Should the Stories on a Map Be?
Keep them high-level, especially at the start. The stories on the map are conversation starters, not final specs.
At the top (the backbone), you’re talking about broad activities like "Manage Account." As you move down, you get into more specific user tasks, like "Change Password" or "Update Profile Picture."
You do not need to write out perfect acceptance criteria on the map itself. The goal is just enough detail to have a real conversation about scope and priority. The granular details come later, when you pull a slice of the map into your backlog to become actual tickets. Story mapping bridges strategy and execution. For the strategic layer above it, see our product roadmap guide. See real examples of how roadmaps present this work in our collection of project roadmap examples.
Ready to stop listing and start mapping? Figr is an AI design partner that turns your thinking into production-ready artifacts. It learns from your live product, generates flows and PRDs that match your design system, and helps you uncover edge cases before they become emergencies.