Welcome to the Design Landscape! What if your design system had a secret sauce? Something that kept every button, color, and font perfectly in sync? That’s what design tokens are supposed to do; they're the nuts and bolts holding everything together.
But let’s be honest: working with them can feel more like assembling flat-pack furniture without instructions. It’s messy and confusing, and sometimes you just want to throw in the towel. If you’re just joining us, be sure to check out Part 1 of this series, where we covered the foundational concepts of design tokens and how they bring consistency to your design system. Now, let’s take a deeper dive and explore how to wield them with confidence.
This guide is here to help you get through the chaos and build a system that works with no meltdowns required. Ready? Let’s get started.
Part 1 : Design Tokens - The DNA of Your Design System
What Are Design Tokens?
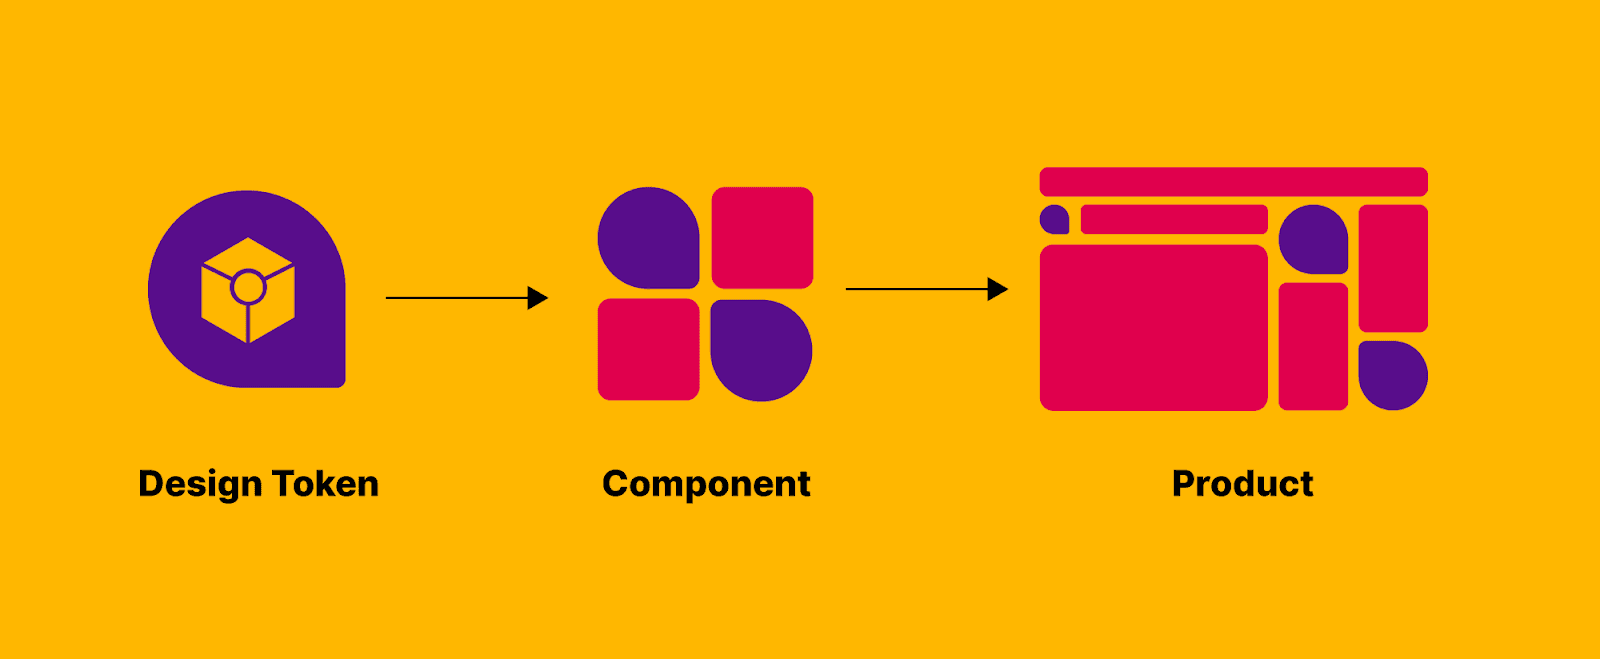
Picture your product as a city, bustling with activity. Design tokens are like the zoning rules that dictate how tall buildings can be, where roads go, and how parks are laid out. They’re tiny, reusable rules that define colors, typography, and spacing, ensuring your city stays cohesive and functional.
Why Are They Important?
Imagine you're tasked with baking a show-stopping wedding cake. But here’s the catch: you don’t have a recipe. Now, your bottom layer turns out chocolate, the middle one somehow becomes vanilla, and, for reasons no one can explain, the frosting ends up... ketchup. Yeah, that’s a disaster no one wants on their big day or in their design system.
Enter design tokens, the recipe for consistency. Think of them as the secret formula that keeps every layer of your cake (or design) in perfect harmony. Let’s dive in a little bit.
Design tokens are your single source of truth for core styles, colors, typography, spacing, and beyond. Instead of manually setting a button’s background to #6200EE every time (and risking one shade being off), you define it as primary-500. This token then gets applied across your entire system. It’s like deciding upfront that the frosting will always be buttercream, not ketchup, no matter who’s baking.
Design Tokens are no less than your Best Friend! How?
- Without a proper system, each platform might interpret design specs differently. Developers could hardcode colors, fonts, or spacing, leading to subtle (or not-so-subtle) inconsistencies. A button that looks perfect on iOS might feel off on Android, and maintaining visual alignment becomes a nightmare as products scale.
Design tokens aren’t just about keeping things looking pretty—they’re the key to maintaining consistency across different platforms. Whether it’s a mobile app, a website, or even a smartwatch interface, tokens ensure that your design language stays uniform, no matter where it appears.
Example: If your button background is primary-500, it stays the same on iOS, Android, and even the web. No rogue colors sneaking in.
- Need to tweak the blue in your brand palette? Change it in one place (your tokens), and voilà every instance of primary-500 updates magically. It's like changing the frosting flavor for every cake you’ve ever made, all at once, adding to Scalability.
- Tokens bridge the gap between designers and developers. Instead of awkwardly trying to explain, "It’s kind of this blue, but not too blue," you just hand over the tokens. They do the talking for you making collaboration smooth.
Let’s break down your system the same way you’d build a cake:
- Foundation (The Cake): This is where tokens live colors (primary-500), typography (heading-1), and spacing (spacing-lg). It’s the base layer that everything else depends on.

- Components (The Frosting): Reusable UI elements like buttons, input fields, or cards. These are styled with tokens, ensuring every button across your design system uses the same recipe.

- Patterns (The Decorations): Think of navigation menus, forms, or dashboards. They combine components into workflows, all adhering to the rules set by your tokens.
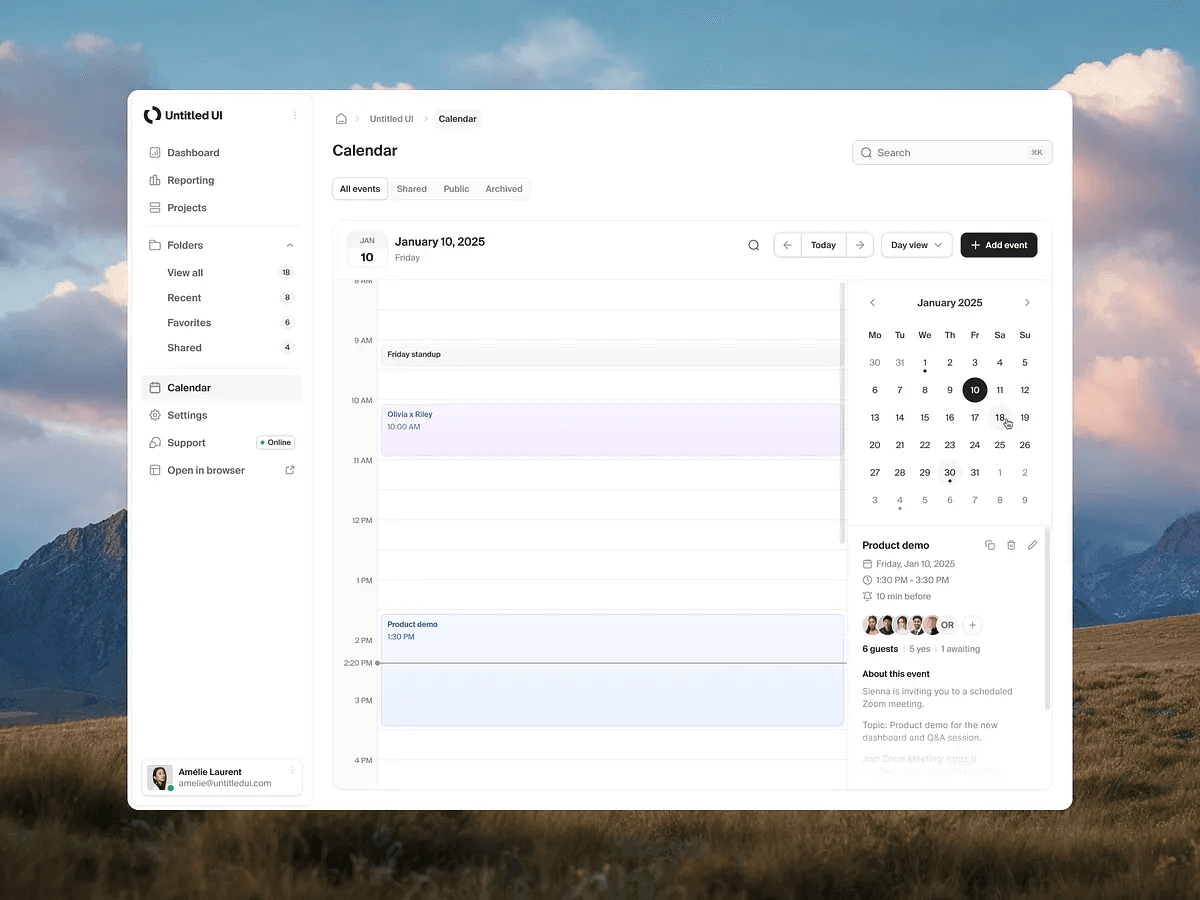
Spending an hour adjusting margins or resolving inconsistencies can be a frustrating and inefficient process, especially when handing off design tokens to developers. Design tokens save you from that chaos. They’re not just for developers, they're for you. They let you focus on the creative stuff instead of manually setting properties every time.
Without tokens, your design system becomes that ketchup-frosted cake: chaotic, inconsistent, and hard to swallow. With tokens? It’s a beautifully layered masterpiece that scales effortlessly and pleases everyone at the table designers, developers, and even your end users.
So, ditch the ketchup. Standardize your recipe. And bake your design system with tokens that guarantee a sweet, consistent experience every time.
Part 2: How do you work with design tokens in real life?
Design tokens are the secret sauce that keeps your designs consistent, scalable, and easy to maintain. Honestly, it’s not a linear process—design tokens aren’t some fancy Material UI thing or reserved for massive design systems. They’re just smart, reusable variables that keep your designs consistent, scalable, and way easier to manage.
Below is a step-by-step guide to see how they work, why they matter, and how to use them in real life.
- Foundations: Making Design Decisions That Last
Before diving into tokens, the first step is defining a strong design foundation. Every successful design system starts with solid choices. These are the decisions that help you set the vibe for your product. This includes selecting:
- Brand Colors: Choose a primary palette that aligns with your brand identity.
- Typography: Establish font families, sizes, and hierarchy.
- Spacing & Sizing: Define spacing increments for layout consistency.
- Elevation & Shadows: Ensure depth and layering across components.
A well-defined foundation ensures that your design decisions are scalable and adaptable across different platforms and devices. Without it, tokenizing designs later becomes chaotic.
- Choosing the Right Colors
Struggling to nail a color palette that’s both functional and visually cohesive? Selecting a color system isn't just about aesthetics. It impacts accessibility, usability, and the overall perception of the product. A great palette should scale effortlessly across themes, feel intentional, and meet accessibility standards yet many designers overlook critical details. The usual culprits? Cluttered, inconsistent shades, colors that fail in different states (hover, focus), accessibility as an afterthought, and no real way to test colors in actual components.
Before finalizing your color palette:
- Test base colors in different lighting conditions and against various backgrounds. Ensure that colors remain visually distinct in dark and light modes, and check them across devices to maintain consistency.
- Ensure accessibility compliance (contrast ratios, color blindness support). Use tools like WCAG contrast checkers to verify that text remains legible and distinguishable for all users, including those with visual impairments.
- Define semantic meanings (e.g., error, success, warning colors). Assign specific colors for functional purposes, such as red for errors, green for success, and yellow for warnings, to create a universally understandable system.
Scroll further and you will stumble upon the true meaning of Semantics in Design Tokens.
Not sure if your palette holds up? We’ve put together a Figma file packed with real-world examples, practical steps, and components to help you validate and refine your choices. Plus, tools like OKLCH Playground and accessibility checkers to ensure your palette transitions seamlessly between light and dark modes.
How to Create a Colour Palette?
Tokens are not just about applying colors and fonts in a basic way. Let’s get real about the how-to of design tokens.
Primary colors take center stage in your product’s UI, often derived from your brand’s palette to reinforce brand recognition and messaging. Secondary colors complement the primary palette and are used sparingly to highlight UI elements, preventing monotony and adding vibrancy. Neutrals or greys are essential for text, borders, and backgrounds extracting them from your primary palette ensures consistency and enhances the user experience, given their extensive use in UI design. Semantic colors serve as visual indicators of the interface’s state, representing actions such as errors, successes, and warnings, helping users navigate and interact with the system intuitively.
What Are Semantics in Design Tokens?
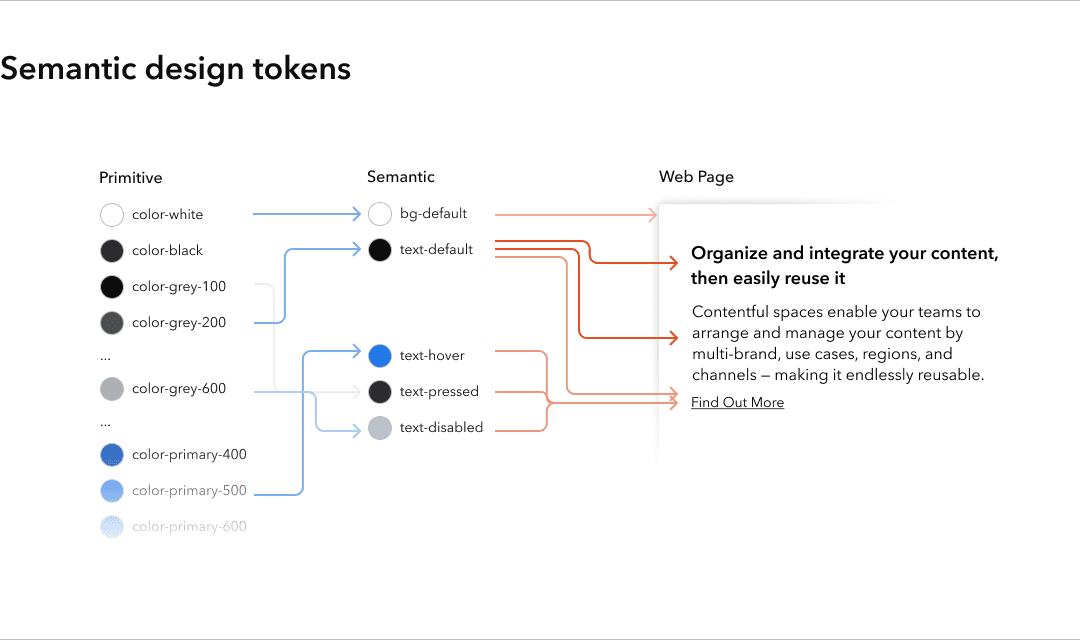
Semantics in design tokens refer to the intentional meaning and purpose behind each token. Instead of simply assigning arbitrary values to colors, spacing, typography, or other UI elements, semantic tokens define their usage context, ensuring consistency across design and development.
Why Are Semantic Tokens Important?
Unlike raw or primitive values (e.g., #007BFF for blue or 16px for padding), semantic tokens help bridge the gap between design and development by labeling design choices with clear, human-readable meanings. This makes interfaces easier to scale, maintain, and update without causing inconsistencies.
For example, a raw color token like blue-500 doesn’t inherently communicate its role in the UI. However, assigning it a semantic token such as primary-500 clarifies that this blue is the brand’s main color. If the brand identity changes in the future, updating primary-500 at the token level automatically updates every instance of that color without needing to manually adjust each component.
Similarly, semantic tokens for state-based UI elements, like error-500, indicate their function within the system. A red tone applied to error-500 is not just a shade of red but a critical visual indicator for warnings, failed form inputs, or system errors.

Examples of Defining Semantic Tokens in Practice:
- Primary Colors: primary-500 → The main color associated with the brand’s identity.
- Success State: success-500 → Used for confirmation messages or positive feedback.
- Error State: error-500 → Indicates issues, warnings, or failed actions.
- Spacing: spacing-md → Defines a medium-sized padding or margin, ensuring consistent spacing throughout the UI.
By using semantic tokens, teams can maintain a clear, scalable design system where design intent remains intact, even as styles evolve.
Why should semantics matter?
Semantics are the backbone of your design system, making everything clear and easy to navigate. When you define primary-500 as your brand’s main color, and error-500 as the warning color, anyone on the team new or experienced instantly understands the meaning behind these tokens. There's no need to dig deep into the specs every time; it's clear what each token is for. And that’s where Figma’s variables come in to make this all more seamless.

Source: Figma Variables
Variables in Figma act as the bridge between your design choices and the semantic meaning behind them. Instead of remembering which specific shade is for your primary color, or manually tweaking each design element, you simply link Figma variables like primary-500 to your components. When you make updates to a variable, those changes instantly ripple through your entire design, keeping everything consistent without the repetitive work. It’s like embedding your design semantics into the tool itself making the design process smoother and more intuitive, ensuring consistency without extra effort.
In short, by using variables, you simplify token management and enhance your designs' semantic clarity. It’s about making the connection between design tokens and their purpose easy to maintain and update, which helps your team stay aligned and focused.

Source: A Guide to Variables in Figma
For example-
Imagine you’re designing a mobile app for a fitness brand. You start with a bold green color to inspire energy and growth. You turn that into a token: primary-500: #28A745. You choose a dynamic, sans-serif font at 20px: heading-1 for your headlines.
When users open your app, they see a cohesive interface with green buttons, crisp headings, and just the right amount of spacing between workout plans. If you later decide to soften the green or tweak the spacing, a single update effortlessly changes the entire app. Design tokens aren’t just technical tools, they're the heartbeat of great design. They let you focus on creativity while ensuring every detail is polished and precise.
So go ahead, start with that purple button or bold headline, and let the tokens do the rest.
Let’s Witness an Example of a Design System Decision Record
Title: Standardizing Button Component Styles
Status: Approved
Date: 10th March 2024
Author: Jane Doe
Context
Our button styles have been inconsistent across platforms, leading to usability issues and increased development overhead. Different teams have implemented varied padding, colors, and states, making maintenance difficult. This inconsistency affects the user experience, creates visual disharmony, and adds unnecessary complexity during development.
Decision
We will define a standardized button component using design tokens for:
Colors: Primary, secondary, and disabled states.
Typography: Font size, weight, and letter spacing.
Padding: Uniform spacing for all button sizes.
States: Clear guidelines for hover, focus, active, and disabled states.
These tokens will be integrated into our design system and coded into reusable components. This approach will ensure that all teams use the same design language, reducing inconsistencies and streamlining both design and development workflows.
Consequences
Positive:
Improved cross-platform consistency.
Easier maintenance and updates.
Faster development cycles due to reusable components.
Potential Challenges:
Initial time investment in setting up tokens.
Need for team alignment and training on new standards.
By standardizing button styles with design tokens, we aim to enhance the overall user experience and foster a more efficient design-to-development process.
Creating Tokens Without Losing Your Mind
Design tokens can feel overwhelming at first, but with the right approach, you can create a system that’s organized, scalable, and stress-free.
Here’s how to structure your tokens step-by-step without any headaches.
Step 1: Centralize Tokens
Think of tokens as treasures, and like all treasures, they need a secure vault. Tools like Figr’s Identity V2 Plugin allow you to store and organize tokens for colors, typography, and spacing in one place.
Why centralization matters:
- It ensures everyone on your team uses the same design elements.
- It reduces confusion when updates are needed.
Example:
Store all your color tokens like primary-500, secondary-300, and error-bg—in a single source so they’re easy to find and apply.
Follow the steps below to bring your design tokens to life. Once you’ve planned your tokens, it’s time to put them into action.
- Install the Plugin: Start by using a tool like Figr’s Identity V2 Plugin to organize and manage your tokens.
- Organize Tokens: Group your tokens by categories colors, typography, and spacing for easy access.
Example: Have folders for colors, text styles, and spacing in your design tool.
- Assign Semantic Names: Use functional names like primary-bg, error-text, or spacing-lg to make tokens self-explanatory.
- Apply to UI Elements: Use your tokens to style components, ensuring consistency across your product.
Example: Paint all your call-to-action buttons with primary-cta for the background and button text for typography.
Think of it this way:
You’re creating a city, and tokens are your uniform brushes. Whether you’re designing a small park (a button) or a skyscraper (a dashboard), you’re painting with the same tools to maintain harmony.
Step 2: Use Semantic Naming
“Red-500” works... until you decide to change red to orange. That’s where functional naming comes in. Instead of naming tokens after what they look like, name them based on their purpose.
It’s like organizing your kitchen. Instead of labeling a jar “Spicy,” label it “For Pasta.” It’s more practical and tells you exactly when to use it.
Step 3: Think in Layers
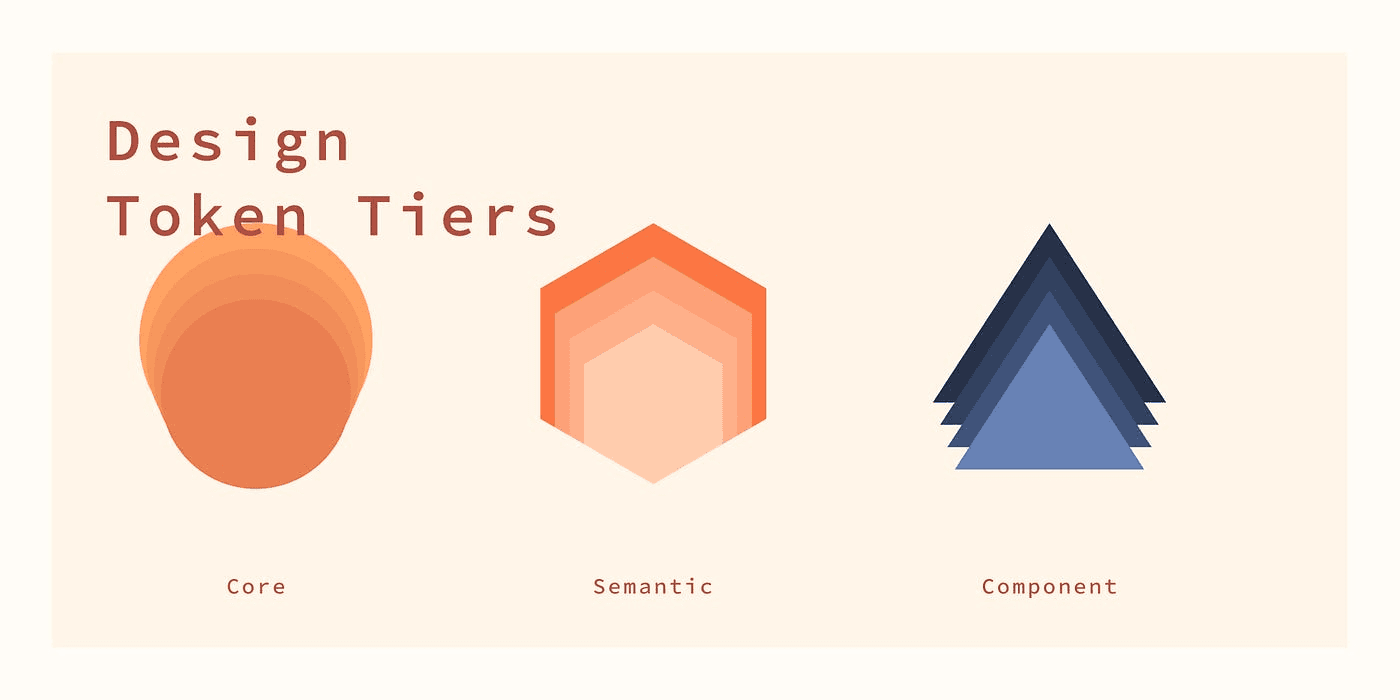
Designing with tokens is like constructing a skyscraper. You need a strong foundation to support everything above it. Break your system into three layers:
- Foundation: These are your tokens for colors, typography, and spacing the building blocks of your design system.
Example: primary-500: #6200EE, heading-1: 24px bold, spacing-md: 16px.
- Components: These are reusable elements like buttons, cards, and modals. Each component pulls from your foundation tokens.
Example: A primary button uses primary-500 for the background, button-text for typography, and spacing-md for padding.
- Patterns: These are higher-level design solutions like forms, navigation menus, or dashboards. Patterns are made up of multiple components.
Example: A login form that includes input fields, a submit button, and error messages.
Visualize a three-tiered pyramid:
- Base: Foundation (colors, typography, spacing).
- Middle: Components (buttons, cards, modals).
- Top: Patterns (forms, navigation).
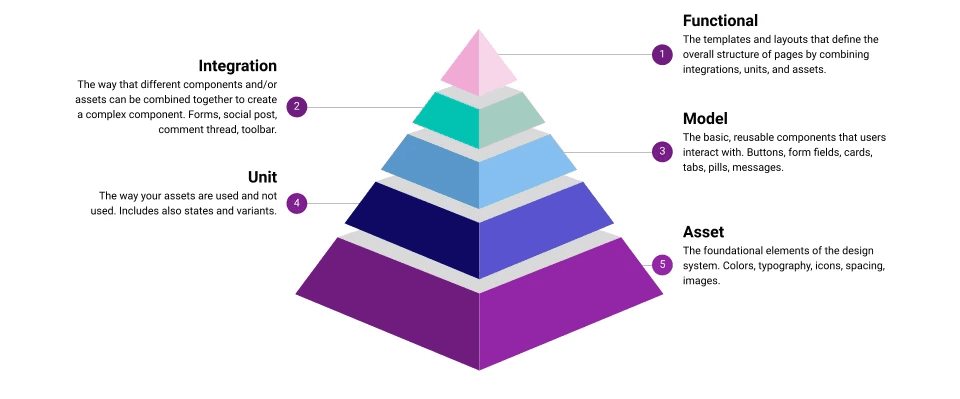
The key to making tokens work is testing. A token might seem like the right choice in theory, but once you apply it to your UI, it may need some tweaking.
For instance, try testing your primary-500 color on different backgrounds to see if it provides enough contrast and accessibility. Similarly, check if the spacing you set for spacing-sm feels too tight or too loose once you see it in action.
Iteration and Scaling Your Design Tokens
Don’t be afraid to start small. When you’re just beginning, you won’t need 30+ variables for every little design element. Focus on what works for you and your project. Maybe start with a handful of colors and a couple of font styles, nothing crazy.
As your product evolves, so should your tokens. Gradually expand your token set as you need more flexibility, but don’t try to overcomplicate things too early. Keep it simple, but flexible enough to scale.
Design tokens aren’t magic. You won’t need to define every shade of blue or every type of spacing right away. Start with what works for your project and team, and then expand. You’ll see as you grow that the more thoughtful your tokens are, the smoother your design system will be to manage.
Tokens ensure your product looks and feels the same everywhere. Buttons, forms, and headlines all follow the same rules, making the user experience seamless. Start small. Begin with a few key tokens for colors and typography, then build layers over time. With a little planning and the right tools, creating tokens can feel less like a chore and more like crafting the perfect blueprint for your designs.
Handing Off Tokens to Developers
Here's where the magic happens: developers take these tokens and implement them in the code. When designers and developers speak the same language, using the same tokens, everyone is on the same page. It speeds up collaboration and eliminates any guesswork.
A seamless handoff process is critical for maintaining design integrity. Some best practices include:
- Using Design Token Management Tools: Tokens Studio, Style Dictionary, or Figma Variables.
- Syncing with Development: Store tokens in a JSON format and integrate them into your codebase.
- Providing Usage Guidelines: Clearly document how and when each token should be used.
Example Token File (JSON Format):
{
"color": {
"primary": {
"500": "#6200EE",
"600": "#5600E3"
},
"error": {
"500": "#B00020"
}
},
"spacing": {
"md": "16px",
"lg": "24px"
}
}
This makes it easier for developers to integrate tokens into CSS, JavaScript, or frameworks like Tailwind and Material UI. The process of handing off tokens to developers will be explored in detail in our next blog.
Case Study: Razorpay’s Blade
Let’s talk about Razorpay’s Blade, a design system that’s a game-changer for anyone working with UI/UX, especially if you're building at scale. Think of Blade as more than just a toolkit, a complete system that keeps everything consistent and smooth across web and mobile platforms. Here’s why it’s so cool and what you can learn from it.
What is Razorpay’s Blade?
Imagine trying to design for both web and mobile, keeping everything consistent without losing your mind. That’s where Blade comes in. It’s an open-source, cross-platform design system that Razorpay uses to make sure all its products look and feel like they belong together no matter where you see them.
The best part? Blade is not just for Razorpay. They made it open-source, so anyone can use it, customize it, and even make it better. Pretty awesome, right?
What Makes Blade Stand Out?
- Cross-Platform Awesomeness
Blade is built to work seamlessly across platforms like React Web and React Native. Whether you’re on a website or a mobile app, you get the same polished experience. - Customization with White Labeling
Need to match your brand’s vibe? Blade lets you tweak and customize components without breaking a sweat. - Accessibility Done Right
Blade prioritizes accessibility, ensuring users of all abilities can use Razorpay products. For example, components follow contrast guidelines and keyboard navigation standards. - Clear Documentation
Everything you need to know is well-documented in tools like Storybook. From tokens to components, it’s all laid out so teams can pick it up quickly. - Open-Source Goodness
By making Blade open-source, Razorpay is encouraging collaboration from the design and developer community. This not only improves the system but also helps others learn and grow. - Blade isn’t just about buttons and colors. It’s like a library where everything is indexed and up-to-date, making it easy for designers and developers to collaborate.
Want to delete something? There’s a destructive button with a red tone.
Need a headline to pop? Grab a typography token.
Everything is consistent and scalable, so you’re not reinventing the wheel every time.
Key Takeaways -
- Think Beyond Just One Platform
When designing a system, consider how it will work across different platforms. Consistency is king. - Accessibility Is Non-Negotiable
Your design should work for everyone. Blade nails this by building accessibility into its core. - Document Everything
Don’t keep your design system in your head. Clear, detailed documentation makes it easier for teams to adopt and follow your system. - Open It Up
If you’re building a design system, consider making it open-source. It’ll foster community contributions and improve faster than you might expect. - So, next time you’re working on a design system, think about Blade. It’s not just a tool, it's a mindset. Want to explore it yourself? Check it out here: Blade - Razorpay’s Open-Source Design System.
Conclusion:
Building a design system is like crafting a masterpiece. It starts messy, with more questions than answers. But as the pieces come together, you’ll find yourself standing in awe of what you’ve built.
With design tokens as your foundation, you’re not just creating a UI, you're building a scalable, future-proof ecosystem.
So grab your tools, embrace the mess, and get started. Your “aha moment” awaits!
What’s Next?
Up next in our Design System series: Bridging the Gap Between Design and Development!
In this post, we'll explore how to foster seamless collaboration between designers and developers. We'll dive into how developers use design tokens in their workflow, and how they approach reviewing components. Understanding this process is key to ensuring your design system is not only effective but also developer-friendly.
Stay tuned as we break down the technical side of design systems in our next blog!


